Loading image

Blogs / Programming

Seamless Python Deployment to AWS EC2 Using GitHub Actions

Seamless Python Deployment to AWS EC2 Using GitHub Actions

  • showkat ali
  • 0 Comments
  • 167 View

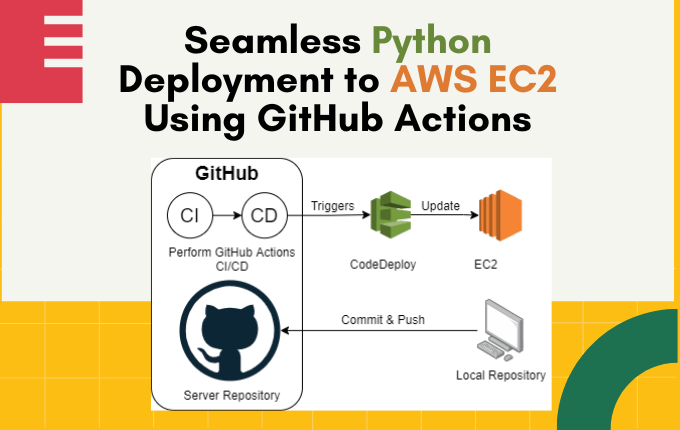
Deploying a Python application to an AWS EC2 instance can be streamlined using GitHub Actions. This guide will walk you through setting up a GitHub Actions workflow to automate the deployment process. The workflow will handle copying your application code to the EC2 instance, installing dependencies, and starting the application.


Step 1: Prerequisites

Before setting up the GitHub Actions workflow, ensure you have the following:

  1. AWS EC2 Instance: A running EC2 instance with SSH access.
  2. SSH Key: The private key (example-key.pem) for SSH access to the EC2 instance.
  3. GitHub Repository: A repository containing your Python application code.
  4. Python Application: A Python application with a requirements.txt file for dependencies.

Step 2: Store SSH Private Key in GitHub Secrets

  1. Go to your GitHub repository.
  2. Navigate to Settings > Secrets and variables > Actions.
  3. Click New repository secret.
  4. Name the secret EC2_SSH_PRIVATE_KEY and paste the contents of your .pem file (e.g., example-key.pem).
  5. Click Add secret.

Step 3: Create the GitHub Actions Workflow

  1. In your repository, create a .github/workflows directory if it doesn’t already exist.
  2. Inside the .github/workflows directory, create a file named deploy.yml.
  3. Add the following code to the deploy.yml file:


name: Deploy Python App to EC2


on:

  push:

    branches:

      - main  # Trigger the workflow on pushes to the main branch


jobs:

  deploy:

    runs-on: ubuntu-latest  # Use the latest Ubuntu runner


    steps:

    - name: Checkout the repository

      uses: actions/checkout@v3  # Check out the repository code


    - name: Set up SSH Agent

      uses: webfactory/[email protected]  # Set up SSH agent for authentication

      with:

        ssh-private-key: ${{ secrets.EC2_SSH_PRIVATE_KEY }}  # Use the private key stored in GitHub Secrets


    - name: Add EC2 instance to known_hosts

      run: |

        mkdir -p ~/.ssh

        ssh-keyscan -H ec2-12-34-56-78.compute-1.amazonaws.com >> ~/.ssh/known_hosts  # Replace with your EC2 instance's public DNS


    - name: Install rsync

      run: sudo apt-get install -y rsync  # Install rsync for file transfer


    - name: Copy files to EC2 using rsync (exclude .git)

      run: |

        rsync -avz --exclude='.git' ./ [email protected]:/home/ec2-user/app  # Replace with your EC2 instance's public DNS


    - name: SSH into EC2 and Deploy

      run: |

        ssh -o StrictHostKeyChecking=no [email protected] << 'EOF'  # Replace with your EC2 instance's public DNS

          # Navigate to the app directory

          cd /home/ec2-user/app


          # Ensure Python3 and pip3 are installed

          sudo yum install -y python3 python3-pip  # For Amazon Linux 2

          # sudo apt-get install -y python3 python3-pip  # For Ubuntu


          # Install dependencies

          pip3 install --user -r requirements.txt


          # Create and enable the systemd service (if not already done)

          echo "[Unit]

          Description=Python Application

          After=network.target


          [Service]

          User=ec2-user

          WorkingDirectory=/home/ec2-user/app

          ExecStart=/usr/bin/python3 /home/ec2-user/app/app.py

          Restart=always


          [Install]

          WantedBy=multi-user.target" | sudo tee /etc/systemd/system/python_app.service


          # Reload systemd, start the service, and enable it to run on boot

          sudo systemctl daemon-reload

          sudo systemctl start python_app

          sudo systemctl enable python_app

        EOF

Step 4: Explanation of the Workflow

  1. Trigger:
    • The workflow is triggered when changes are pushed to the main branch.
  2. Checkout the Repository:
    • The actions/checkout@v3 action checks out the repository code.
  3. Set Up SSH Agent:
    • The webfactory/[email protected] action sets up the SSH agent and uses the private key stored in GitHub Secrets for authentication.
  4. Add EC2 Instance to known_hosts:
    • The ssh-keyscan command adds the EC2 instance's public DNS to the known_hosts file to avoid SSH host key verification prompts.
  5. Install rsync:
    • The rsync utility is installed to efficiently copy files to the EC2 instance.
  6. Copy Files to EC2:
    • The rsync command copies the application files to the EC2 instance, excluding the .git directory.
  7. SSH into EC2 and Deploy:
    • The workflow logs into the EC2 instance and performs the following tasks:
      • Installs Python and pip (if not already installed).
      • Installs dependencies from requirements.txt.
      • Creates a systemd service to manage the Python application.
      • Starts and enables the service to run on boot.

Step 5: Customize the Workflow

  • Replace ec2-12-34-56-78.compute-1.amazonaws.com with your EC2 instance's public DNS.
  • Replace /home/ec2-user/app with the desired deployment directory on your EC2 instance.
  • Update the ExecStart path in the systemd service to point to your application's entry point (e.g., app.py).

Step 6: Push and Test the Workflow

  1. Commit the deploy.yml file to your repository and push it to the main branch.
  2. Go to the Actions tab in your GitHub repository to monitor the workflow.
  3. Once the workflow completes, your Python application should be deployed and running on the EC2 instance.

Step 7: Verify the Deployment

  1. SSH into your EC2 instance:


ssh -i "example-key.pem" [email protected]

Check the status of the systemd service:

sudo systemctl status python_app
  1. Access your application via the EC2 instance's public IP or DNS.

Conclusion

By following this guide, you’ve set up a GitHub Actions workflow to automate the deployment of your Python application to an AWS EC2 instance. This workflow ensures that your application is deployed consistently and efficiently whenever changes are pushed to the main branch. You can further customize the workflow to suit your specific needs, such as adding environment variables or running tests before deployment. Happy deploying! 🚀


  • Programming
showkat ali Author

showkat ali

Greetings, I'm a passionate full-stack developer and entrepreneur. I specialize in PHP, Laravel, React.js, Node.js, JavaScript, and Python. I own interviewsolutionshub.com, where I share tech tutorials, tips, and interview questions. I'm a firm believer in hard work and consistency. Welcome to interviewsolutionshub.com, your source for tech insights and career guidance.

0 Comments

Post Comment

Recent Blogs

Recent posts form our Blog

Laravel 10 Eloquent whereBetween() Query: A Powerful Filtering Query

Laravel 10 Eloquent whereBetween() Query: A Powerful Filtering Query

showkat ali
/

Read More
Coco Gauff Falls Short at Wimbledon, Losing to Emma Navarro

Coco Gauff Falls Short at Wimbledon, Losing to Emma Navarro

showkat ali
/
News

Read More
Step-by-Step Guide: Unzipping, Extracting, and Saving ZIP Files to a Database in Laravel

Step-by-Step Guide: Unzipping, Extracting, and Saving ZIP Files to a Database in Laravel

showkat ali
/
Programming

Read More
How to Fix CORS Errors in Laravel 11/12

How to Fix CORS Errors in Laravel 11/12

showkat ali
/
Programming

Read More
The Future of SEO: What Happens If ChatGPT Kills Search Engines?

The Future of SEO: What Happens If ChatGPT Kills Search Engines?

showkat ali
/
Programming

Read More
Top 10+ Best Web Frameworks to Learn for a Successful Web Development Career

Top 10+ Best Web Frameworks to Learn for a Successful Web Development Career

showkat ali
/
Programming

Read More